How to Apply for a US Student Visa?

Hemani Tandon
Published on October 29, 2025

Every year, millions of students wish to study in USA. However, out of thousands only a couple hundred of them get the chance to study at the iconic US universities like Harvard, Princeton, Yale, Brown, Stanford, and more. As you are also planning to pack your bags and leave for the best study abroad destination to experience premium quality education, there are some things you have to take care of first. While securing an admission and arranging your funds are one of the obvious things to do, getting a student visa to study in USA is also required.
Today, in this blog, we are going to share what are the types of US student visas and how you should apply one yourself in a step-by-step guide. So, let’s flawlessly plan your Study Abroad Dream in the USA without any hurdles.
What are the Types of US Student Visa?
Before we move towards knowing how you should apply for a US student visa, here is a list of type of US student visas. One of the common reasons for US visa rejection is students failing to understand the right visa they need to apply in order to study in USA. This is why here is a clarification on what are the types of US student visas and which one you need to Apply for Studying in USA.
- F-1 Visa: The most common Student Visa to Study in USA, this one is for students planning for a longer period of education in the USA like pursuing a full degree at any US university. This visa allows a full-time enrolment and limited on-campus work options.
- J-1 Visa: This visa is for exchange students who are planning to pursue their rest of the education in one of the US universities. This visa is only for students participating in an exchange programme, internship, or fellowship. This visa is often offered by the university itself.
- M-1 Visa: This visa is for students planning to pursue vocational studies in the USA. This visa is strictly for students enrolling for technical programmes and not for academic purposes. The visa doesn’t allow students to work in any manner besides the practical training after course completion.
Mostly international students who are planning to study in USA, they apply for F-1 visa. However, as minor mistakes can lead to a visa rejection, now, let’s move on to know what are the common reasons for a US student visa rejection.
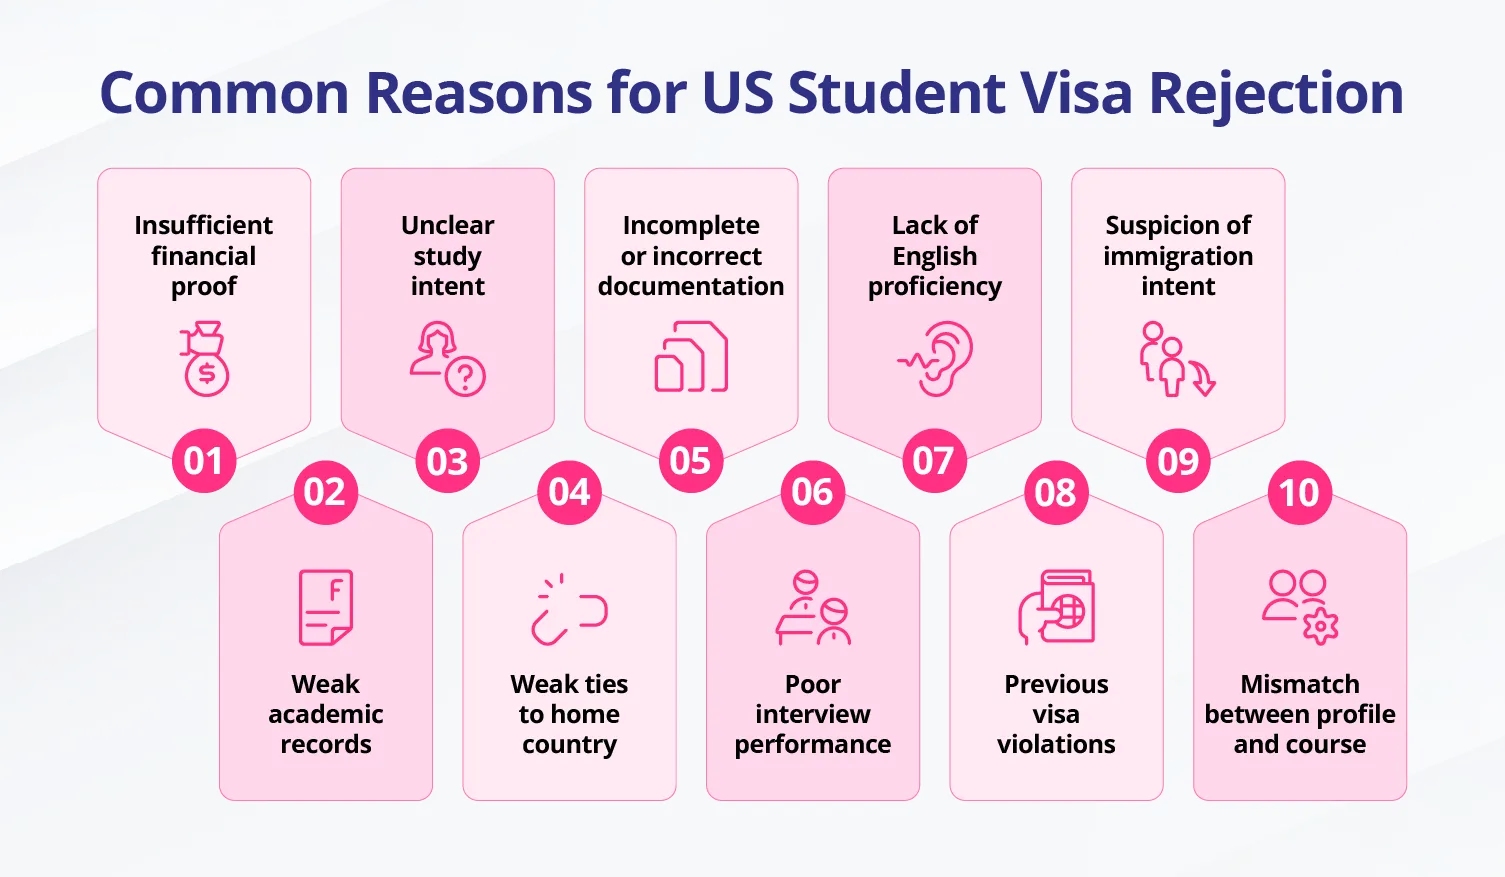
Common Reasons for US Student Visa Rejection
One minor mistake can lead to your visa rejection, shattering your ultimate dream of studying abroad. As you can’t risk your chances of studying at a premium university in the US, it is always better to be careful with your visa documents. Here are some of the common reasons for US student visa rejection.
To ensure your UK student visa doesn’t lack any document and it gets approved in one go then here is how you are going to apply for your student visa.
Step-by-Step Guide on Applying US Student Visa
By now, you must have got an understanding of the importance of the approval of a student visa. As it may take time and before flying to the USA, you have to have your student visa handy, here is how you are going to complete your US student visa easily.
Step 1: Get Accepted by a SEVP-Approved Institution
The very first step towards attaining your US student visa is securing admission at a SEVP- approved university or college. It is only the SEVP (Student and Exchange Visitor Program) recognised universities and colleges that are eligible to issue the necessary immigration forms. After getting the admission acceptance, you will either receive a I-20 Form (for F-1/M-1 applicants) or a DS-2019 (for J-1 applicants) Form depending on whether you have applied for a full-time course, for an exchange programme, or for a technical programme. These forms serve as the foundation of the visa application process and contain vital details such as programme dates, tuition fees, and SEVIS identification numbers. Without them, you cannot proceed further, making admission to a SEVP-approved institution your gateway to studying in the USA.
Step 2: Pay the SEVIS Fee
The next step in your US student visa approval process is to pay the SEVIS fee. Once you get admission in a SEVP-approved university or college in the US, your next step is to register with the Student and Exchange Visitor Information System (SEVIS) and paying the mandatory I-901 SEVIS fee. The amount varies by visa type: $350 for F-1 and M-1 visas, and $220 for J-1 visas. The payment can be made online using a credit card or other acceptable methods. It’s essential to print and safely keep the SEVIS fee payment receipt as it must be presented at your visa interview. Missing this step can lead to your US student visa rejection.
Step 3: Complete the DS-160 Online Application
The next form you need to collect for your US student visa is the DS-160 form. After paying the SEVIS fee, you must fill out the DS-160 Non-immigrant Visa Application Form online. This form required detailed information about your personal background, academic history, travel plans, and visa intent. As a student filling out this form, you must upload your recent passport-size photo that meets the strict US visa photo guidelines. Once submitted, the system generates a DS-160 confirmation page with a barcode, which is crucial for scheduling your visa interview. Be extremely careful while filling out this form; errors, omissions, or inconsistencies can cause unnecessary delays or even denial of your US student visa. Always review the application thoroughly before final submission.
Step 4: Pay the Visa Application Fee
The next step in your US student visa process is paying the Machine-Readable Visa (MRV) fee, which is currently $185 for all student categories, including F-1, J-1, and M-1. This fee is non-refundable and non-transferable, even if your application is denied. The payment methods also vary depending on your country, but generally you can pay online, through bank transfer, or at designated partner banks. Once paid, you will receive a payment receipt, as losing it could complicate the process of confirming or attending your scheduled interview slot.
Step 5: Schedule your Visa Interview
After paying the required fees, you must book your visa interview appointment at the nearest US Embassy or Consulate. Interview wait times differ across countries and cities, so applying early ensures you secure your desired slot. During scheduling, you’ll need your DS-160 confirmation barcode and payment receipt. Once confirmed, you will receive a visa appointment letter, which must be carried on the day of your interview. Be mindful of deadlines, schedule your interview at least three to four months before your programmes begin to allow for any administrative delays or additional document verification requirements.
Step 6: Gather Required Documents
Documents play a crucial role in your study abroad journey, missing one can led to rejection of your US student visa. This is why preparing a complete set of documents is critical for your visa interview. The list of documents that you must keep handy includes a valid passport, your I-20 or DS-2019, the DS-160 confirmation page, SEVIS and visa fee receipts, the interview appointment letter, and recent passport-sized photographs. Additionally, you must provide proof of financial ability to cover tuition and living costs, such as bank statements, scholarship letters, or loan approval letters. Academic transcripts, test score (IELTS, TOEFL, GMAT, GRE, etc.), and documents demonstrating ties to your home country are also essential. Properly organising these documents increases your confidence and leaves a positive impression.
Step 7: Attend the Visa Interview
And at last, comes the part of attending the visa interview. The US student visa interview is the most decisive step in the entire process. Conducted by a US consular officer, the interview assesses your academic intent, financial capability, and reasons for studying in the USA. Expect the series of questions about your chosen programme, university, funding sources, and post-graduation plans. The interview officers want assurance that you are a genuine student who will return to their home country after graduation. During the interview, to clear it, be confident, clear, and concise in your answers as you will not get any other chance. Carry all required original documents, stay calm under pressure, and avoid giving memorised or inconsistent responses.
Prepare for your US Student Visa with MetaApply IE
The journey to study abroad is not an easy one, especially when you decide to Study in USA. The high competition and tough admission, visa, and scholarship process makes it difficult for study abroad aspirants to clear the process in one go by themselves. This is where they require assistance from study abroad consultants. As you are also a study abroad aspirant struggling with your study abroad plans, then here we are. At MetaApply IE, our counsellors not only guide you by shortlisting the right university and courses for you, but we also ensure you I-20 and DS-160 forms are flawless. Besides this, our counsellors also aim to prepare you for your visa interview, ensuring you say the right answers confidently and show the right intent to return to your home country. So, don’t let the fear of documentation stop you from your dream of studying in the USA, connect with our counsellors today and get started with your dream.
Note: All prices mentioned are approximate and may vary. Students should refer to official government or university websites for accurate and updated figures.
Interested in Study Abroad?
MetaApply can help - fill the form
Enquire Now
Frequently Asked Questions
IELTS is not mandatory for a USA student visa itself. However, most universities require proof of English proficiency through IELTS, TOEFL, or equivalent exams. Admission determines visa eligibility, so check your chosen institution’s requirements before applying.
Choose based on your programme: F-1 for academic degrees, J-1 for exchange or sponsored programmes, and M-1 for vocational or technical courses. Your university’s acceptance from (I-20 or DS-160) indicates the visa category you need.
Applicants must have an admission letter from a SEVO-approved institution, valid passport, sufficient financial recourses, proof of academic readiness, and strong intent to return home. Additionally, they must pay the SEVIS fee and complete the DS-160 application form.
The F-1, J-1 and M-1 visas require a $185 application fee. Additionally, SEVIS I-901 fee costs $350 for F-1/M-1 and $220 for J-1. Other expenses may include document preparation, travel to consulate, and courier charges.
Yes, F-1 students can work up to 20 hours per week on-campus during academic sessions and full-time during breaks. Off-campus employment requires authorisation through CPT (Curricular Practical Training) or OPT (Optional Practical Training) after completing coursework.